Exercise #1- For Uneven Hips
Building Stability, Rotation, and Neurological Connection From the Ground Up
Pastor Kevin Cicchino
Category: Wellness Foundations · Movement Basics
Tags: Hip Stability, Uneven Hips, Human Movement, Posture, Mobility, Stability, Kinesiology, Pelvic Stability, Movement Basics, Workshop Resources, Whole Person Wellness
A note before we begin:
This is one exercise from a much larger toolkit. It is not a complete program and it is not the only answer to what you are experiencing. What it is — is a well-chosen, carefully structured starting point that addresses several of the core issues associated with hip imbalance simultaneously. Applied consistently and with genuine attention, it begins the process of restoring what the foundation article described.
If you have not read our Foundation piece — Your Hips Were Designed for This — we recommend starting there. The understanding you bring to this exercise determines what you get out of it.
LINK: Your Hips Were Designed for This — Understanding How Hip Function Drives Your Whole Body
What Uneven Hips Actually Do to Your Body
When one side of the pelvis sits higher than the other — whether from muscle imbalance, compensation patterns, prior injury, or accumulated postural habits — the effects move through the entire body in both directions.
Going down: added pressure through the IT band, altered loading through the knee, changes in how the ankle and foot contact the ground. People often treat their knee pain or foot discomfort without ever addressing the hip imbalance driving it.
Going up: lower back pressure, nerve sensitivity along the lumbar spine, tension patterns through the thoracic spine and into the neck and shoulder girdle.
The hip imbalance itself produces: low strength on the affected side, low endurance, poor balance, lateral chain deficiency, and reduced coordination between the left and right halves of the body.
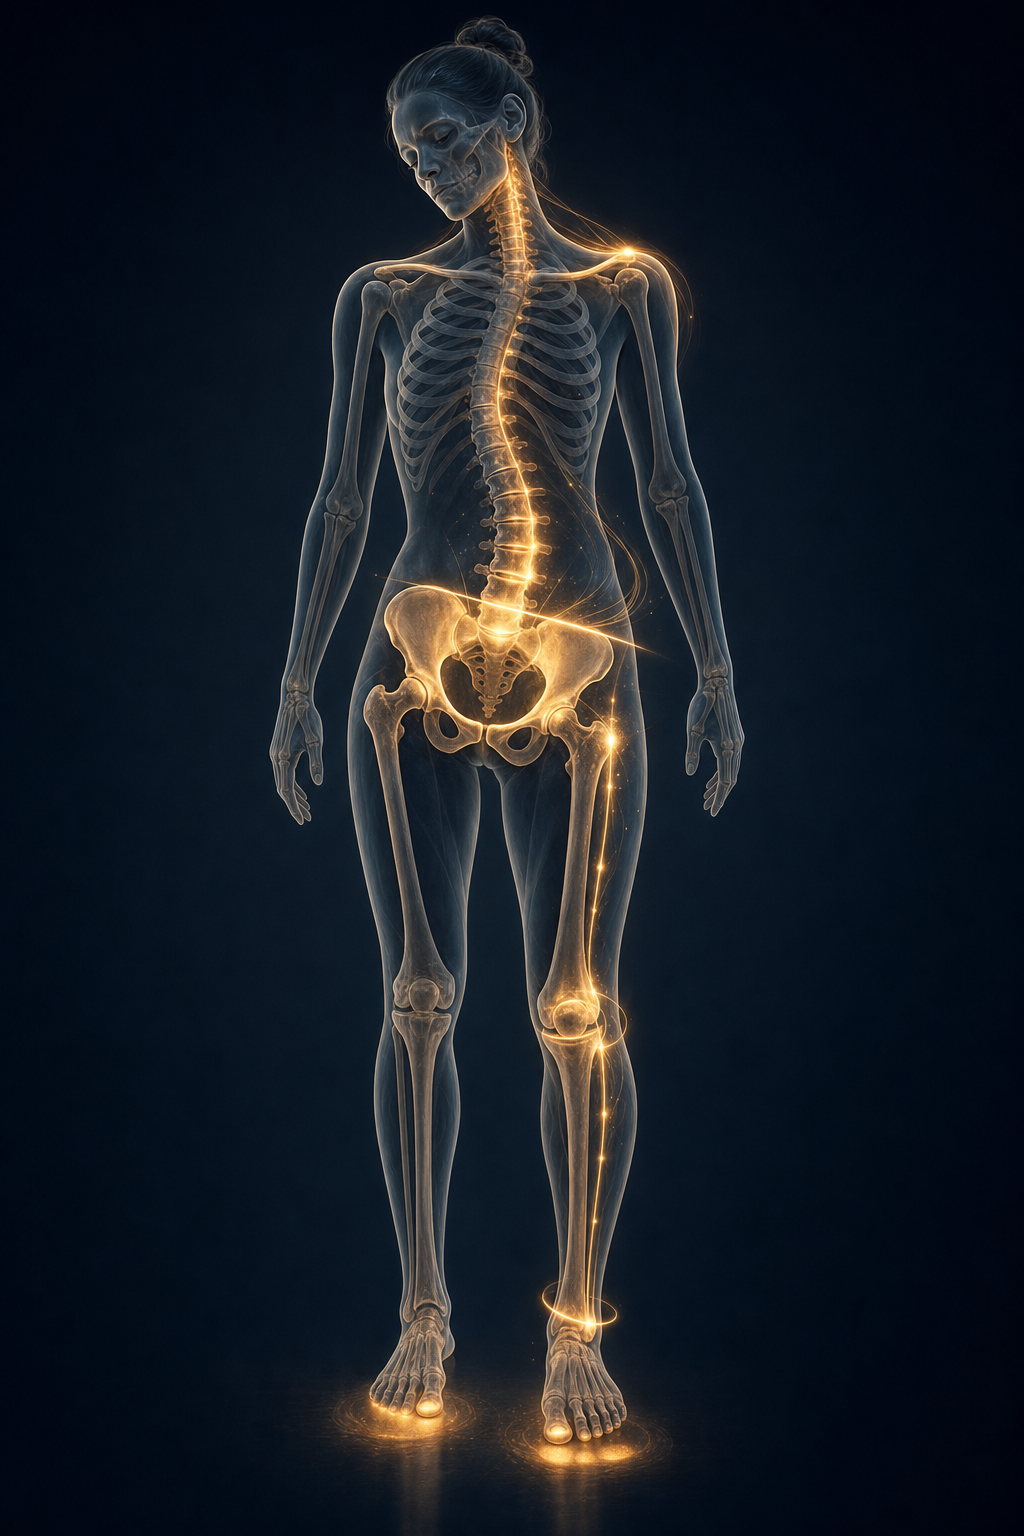
[IMAGE: Diagram showing how pelvic tilt creates cascade effects up to neck and down to foot]
What most approaches miss is this — the problem is not the location of the pain. The problem is the loss of neurological communication between the body's active and passive sides. Until that conversation is restored, the symptoms will keep moving.
This exercise addresses the conversation.
What This Exercise Trains
Before describing the movement, it is worth being clear about what is actually being developed — because this is not what most exercise descriptions focus on.
Unilateral stability — the ability of one side of the body to stand, load, and function independently while the other side supports and releases.
Active and passive integration — the standing leg is active, driving into the ground. The raised leg is passive, supported against the wall. These two states — active and passive — must learn to coexist and communicate in real time. This is the neurological work the exercise is doing.
Spinal rotation under postural extension — the bent-over position with rotation is not a stretch. It is a neurological reset. The spine rotating at approximately L1 while the body maintains postural extension — not rounding, not collapsing — allows the body to open range of motion through breathing and rotation rather than force.
Diaphragmatic breathing as the mechanism — this exercise does not work without it. The breath is not background. It is the tool that allows the hips to open, the rotation to deepen, and the neurological connection to reset.
Ball control — holding the ball between the raised knee and the wall without gripping it with muscular force is its own skill. The goal is controlled abduction and adduction working together — not squeezing the knees together but learning to manage both directions of force simultaneously.
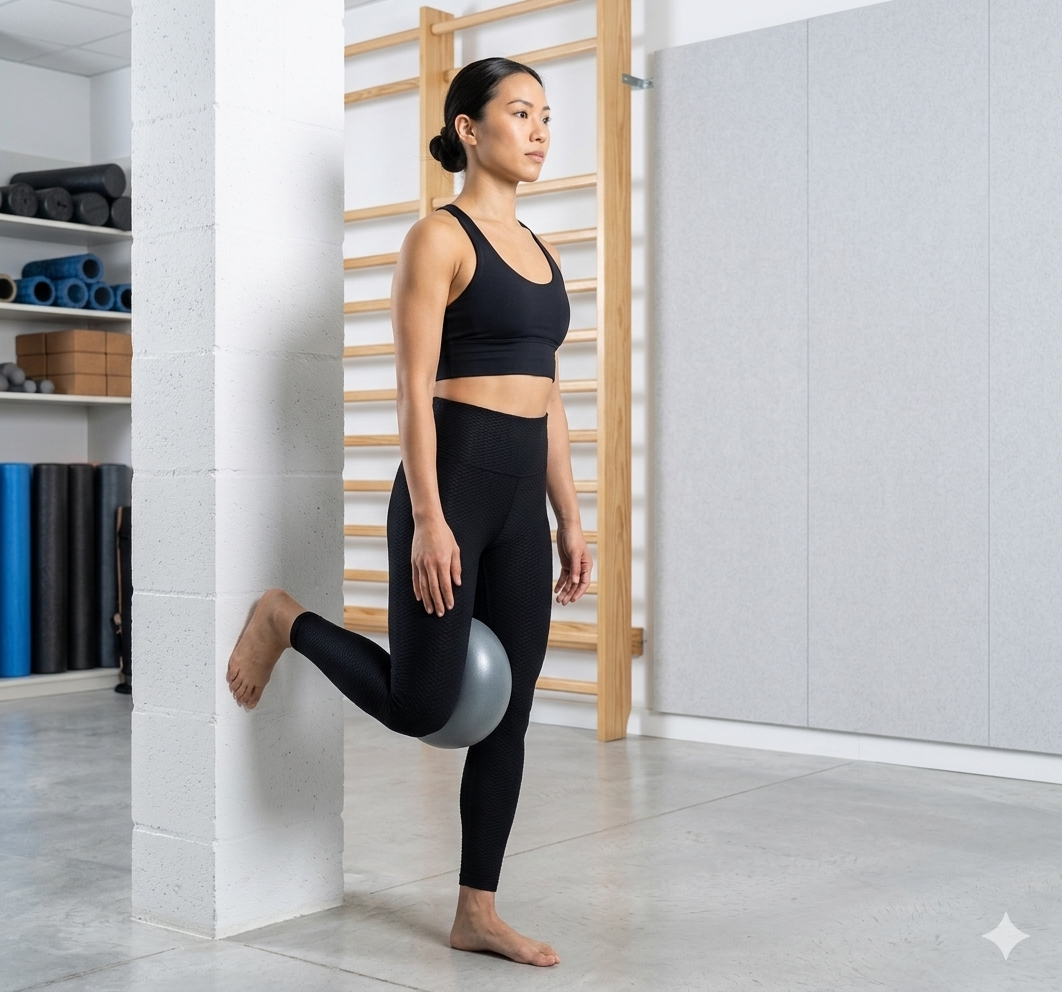
The Setup
[IMAGE: Starting position — standing, one foot on ground, opposite foot raised behind at 90 degrees against wall, ball between raised knee and wall]
What you need:
A clear wall space
A medium-sized ball — a playground ball or small stability ball works well
Enough space to bend forward without obstruction
Starting position:
Stand facing away from the wall, approximately one foot-length away
Raise one leg behind you and place the foot against the wall at approximately 90 degrees
Position the ball between your thigh’s, above your knees
You are now standing on one leg with the ball between your bent knee of your straight leg
Find your standing foot — feel it pressing into the floor, not gripping, but connected. This is your active side.
The raised leg is your passive side. It is not driving. It is supporting and receiving.
Which side goes first: Begin with the side that feels weaker or less stable. Training your weakness raises your overall strength. Training your strength over your weakness creates broken chain and reinforces the imbalance.
The Movement — Five Starting Points
These are not five separate exercises. They are five layers of attention within the same position. You do not rush to the next layer. You earn it by genuinely connecting with the one before it.
Step 1 — Find the Floor
Before anything else moves — find your floor.
Feel your standing foot pressing into the ground. Not gripping. Not white-knuckling. Pressing — the way your foot presses the ground when you simply stand well. Feel the connection travel up through the ankle, the knee, the hip.
Now feel the wall through your raised foot. Your foot is not pushing hard into the wall. It is finding the wall the way your standing foot finds the floor — with intention, not force. The wall becomes the floor for that leg.
When both of these connections feel settled — you have Step 1.
This may take longer than you expect. That is information. The difficulty of finding this simple connection tells you exactly how much neurological work this exercise has to do.
Step 2 — Find the Pocket
With both connections established, begin to sit back slightly — as if you are beginning a squat. Not a full squat. A suggestion of one.
You are looking for what we call the pocket — the fluid space between where your body is pushing back against the wall through your raised foot and where your standing femur is taking the weight of your body. When you find it, the posture settles. The spine lengthens slightly. The hips feel like they have somewhere to go.
Do not force this. Do not look for it with muscular effort. Let the breath help you find it.
Inhale — let your belly have freedom to expand. Not inflating the belly, but allowing it to open. Feel the diaphragm rise. Feel the sternum lift slightly. Feel the back respond.
Exhale — let the breath carry you a little deeper into the pocket without collapsing the posture.
The breath is finding the range of motion. You are not forcing it.
Step 3 — Hold the Ball
Now bring your attention to the ball.
You are not squeezing the ball with your knee. You are not pressing your knees together. You are managing the ball through controlled abduction and adduction — the muscles that move your leg away from your body and toward it — working together to keep the ball in place without gripping.
Most people find this difficult at first. The ball slides. The knee drops. The posture compensates.
That difficulty is the exercise. The nervous system is learning to coordinate two opposing muscle actions simultaneously while maintaining postural stability. This takes repetition. It takes patience. It takes the willingness to let the body figure it out rather than muscling through it.
Hold the ball. Breathe. Feel where it wants to slip and what your body does to prevent it.
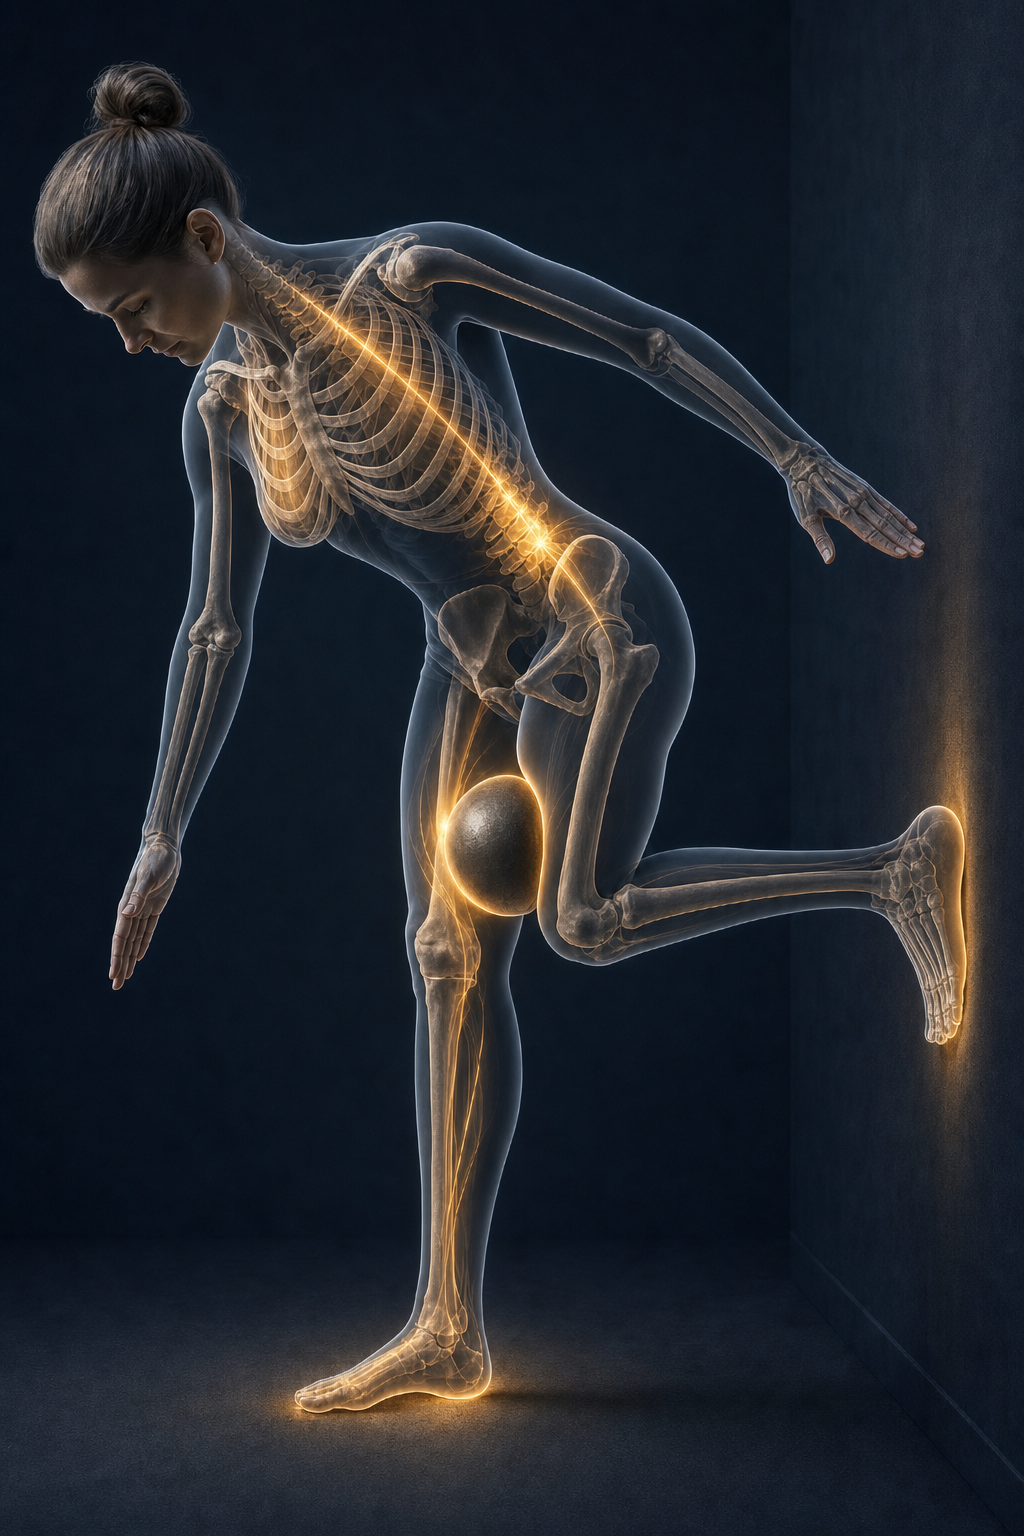
Step 4 — Bend and Rotate
When Steps 1 through 3 feel connected — when the floor is found, the pocket is settled, the ball is held, and the breath is moving — begin to hinge forward from the hip.
You are not rounding over. You are not reaching aggressively for the floor. You are maintaining postural extension — back long, spine extended — and allowing gravity and breath to carry you forward and down.
As you hinge forward, allow the arm on your standing leg side to reach toward that foot. Right foot on the ground — left arm reaches toward the right foot. Left foot on the ground — right arm reaches toward the left foot.
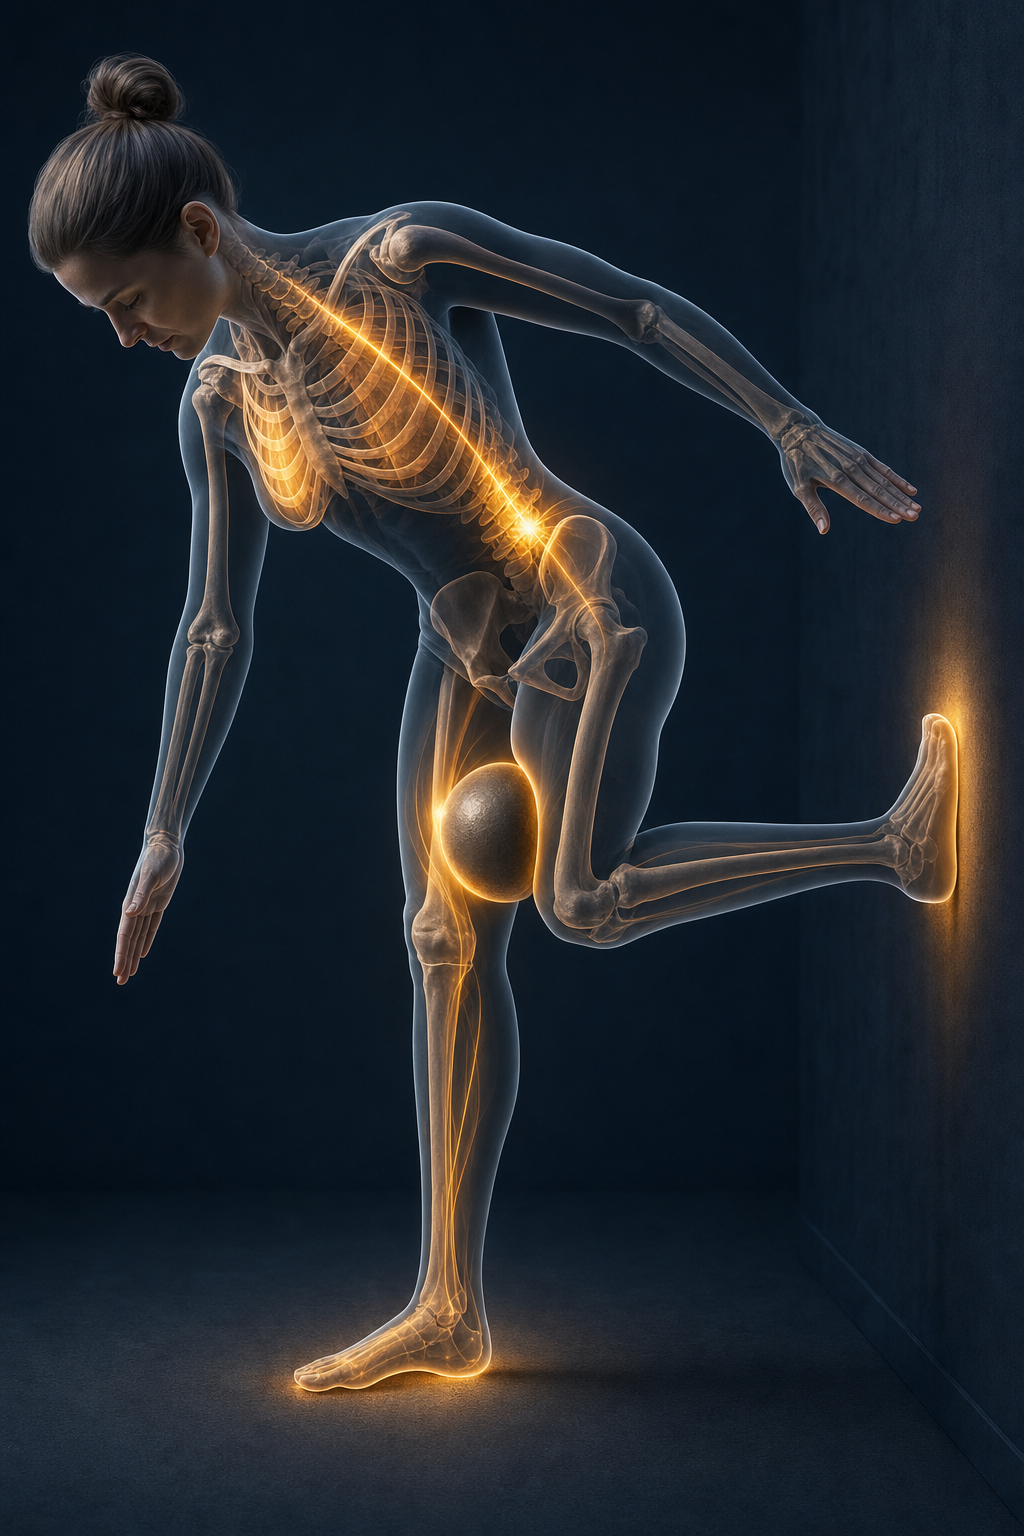
[IMAGE: Bent position — spinal rotation, arm reaching toward standing foot, postural extension maintained]
The goal of this reach is not to touch your foot. The goal is to give your nervous system a direction — to activate the shoulder chain connection to the hip chain on the opposite side. If you can touch your foot, that is fine. If you cannot, come as far as you can while maintaining your posture and hold there.
Do not round. Do not strain. Do not rush the depth.
The rotation happening in your spine — approximately at L1 — combined with the postural extension and the diaphragmatic breath is what is doing the neurological work. How far you reach is far less important than how well you hold the position when you get there.
Hold for a few seconds. Breathe. Feel what is happening on both sides simultaneously.
Step 5 — Notice and Stay
This is the most important step and the one most people skip.
Before you come back up — notice.
What does the active side feel? What does the passive side feel? Is the ball still in place? Is the breath still moving? Is the posture still extended or has it collapsed?
Where is the most difficult point in this movement for you? Is it finding the pocket? Holding the ball? Maintaining the extension in the rotation? Breathing through the position?
That answer is your training target. The nervous system is looking for consistent, focused input on the areas that are most disconnected. The feedback your body gives you in this position — the tightness, the shakiness, the sensation of something not quite connecting — is not a warning to stop. It is information about where the work needs to happen.
Stay in the position as long as you can maintain quality. When the posture starts to collapse or the ball starts to slide consistently, come back up. Do not force more repetitions at the expense of the connection.
How to Progress
This exercise is practiced not performed. The goal is not to complete a set number of reps. The goal is to deepen the neurological connection each time you do it.
Frequency: Three to four times per week is appropriate for most people. More than that depends entirely on recovery — if you feel genuinely recovered and the connection feels cleaner, you can practice more. If you are cramping, if local areas feel overloaded, if the nervous system feels overwhelmed rather than engaged, take more rest.
Signs you are ready for the next layer:
The pocket feels natural to find
The ball stays in place without fighting
The breath moves freely through the bent position
The rotation feels connected rather than forced
You notice a difference between sides that feels like information rather than struggle
When those things are true — the next five layers of attention become available. They do not change the exercise. They deepen your engagement with the same movement.
Soreness: Some muscle soreness is normal and expected — particularly through the hip, glute, and inner thigh. Tendon lengthening soreness is also normal. Sharp pain, nerve-like sensations that do not resolve, or cramping that you cannot control are signals to stop and consult a professional.
What You Are Actually Building
Every time you practice this movement correctly you are:
Restoring the neurological conversation between the active and passive sides of your body
Teaching the nervous system that stability is available without compensation
Building unilateral strength in the context of the whole body — not in isolation
Giving the diaphragm and pelvic floor a chance to coordinate under real postural demand
Creating the conditions for the lateral chain to function as it was designed
This is not a hip exercise. It is a conversation between your body and your nervous system — and the hips are where that conversation has broken down.
The body is conditioning itself. The wall is a tool. The ball is a tool. The floor is a tool. You are the system doing the work.
A Word About Patience
Most people want to know how long this takes.
The honest answer is — it depends on how long the imbalance has been there, how consistently you practice, and how genuinely you listen to what your body tells you during the movement.
What we can tell you from years of working with people is this: the changes that happen in this kind of movement are often felt before they are seen. Something shifts in how you stand. Something releases in how you walk. The side that felt locked begins to participate again.
Those are signs the conversation is being restored.
Stay with it. Train your weakness. Let the body tell you what it needs. And remember — this is one piece of a larger process, not the whole answer.
What Comes Next
As the foundation becomes solid, additional movements that work the anterior and posterior chains, the rotational patterns, and the cross-body connections become available. Each one builds on what this exercise establishes.
We will be releasing those in the articles that follow.
Connected Resources
Foundation piece for this article:Your Hips Were Designed for This — Understanding How Hip Function Drives Your Whole Body
Related reading: Are You Actually Moving — or Just Being Moved? Does It Matter Whether Movement Is Active or Passive? What the Research Actually Says
This article is for educational and informational purposes only. The content presented here is not intended to diagnose, treat, cure, or prevent any condition or disease. Nothing in this article should be taken as medical advice. Before beginning any new movement practice, exercise program, or physical activity — particularly if you have a current or prior injury, chronic condition, or have been advised by a healthcare provider — please consult your physician or a qualified healthcare professional. The exercises and educational content shared here are general in nature and may not be appropriate for every individual. Always listen to your body and seek professional guidance when needed.
After the Exercise — Learn to Walk Again
This is not a figure of speech.
After completing this exercise on both sides — before you sit down or move on — walk.
Walk slowly and honestly. Pay attention to how your feet contact the ground. Notice whether one side feels different from the other. Notice how your hips are moving. Notice whether your knees are tracking differently. Notice whether the side that felt locked is participating more than it was before.
You can also try:
High steps — lifting your knees deliberately higher than normal as you walk, feeling the hip flexor engagement on each side and noticing whether both sides respond equally.
Lateral steps — moving side to side slowly, feeling the abductors and the lateral chain on each side. Notice where the stability is and where it isn't.
Stair stepping — step up, then step back down backwards. The backwards descent particularly engages the posterior chain and gives honest feedback about hip stability under controlled load.
Squat and stand — come down into as much of a squat as your range of motion comfortably allows, then stand back up. Feel how the hips load and unload. Feel whether both sides are participating or whether one is still compensating.
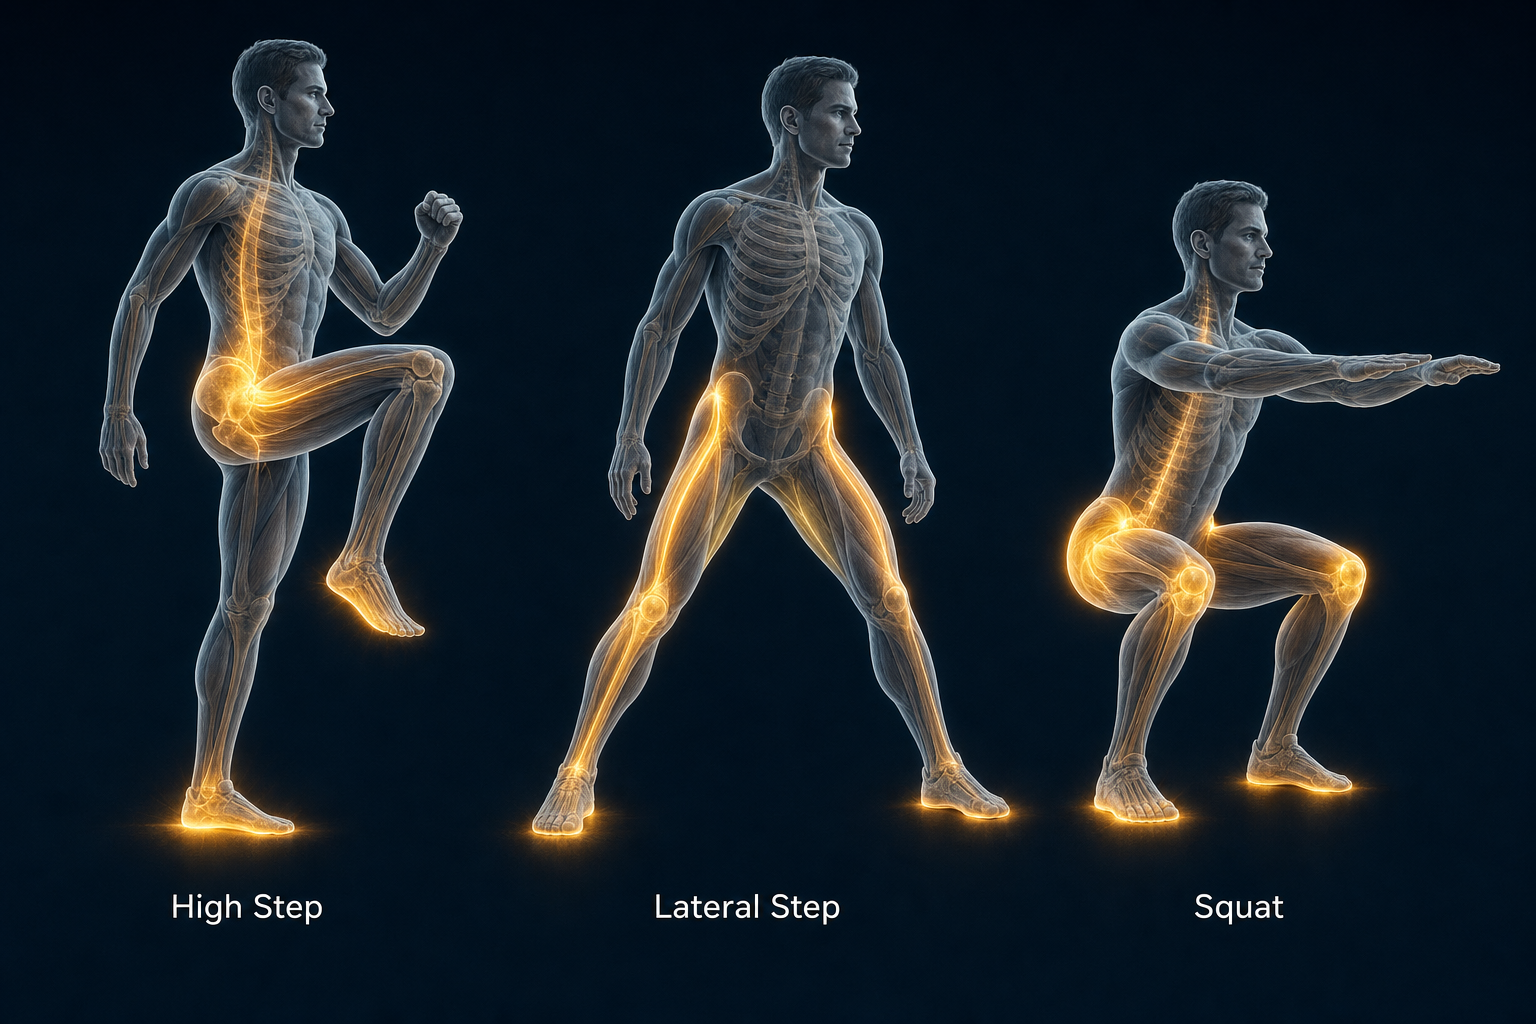
[IMAGE: Walking sequence showing high step, lateral step, and squat position for post-exercise assessment]
You may hear adjustments or clicking. You may feel things shift. These are often natural resets — the body finding neutral after being held away from it. The body does not want to be locked in compensated positions. When given the right conditions, it will move toward neutral on its own.
Walking is the honest test. It crosses all the postural positions the exercise worked through — in a real, functional, everyday context. When people are genuinely honest about what they feel walking after this exercise, they notice the difference.
That difference is the proof. It is the manifestation of what just changed in your body.
A Closing Word
Take a moment before you move on.
Something changed. It may be subtle. It may be significant. But if you practiced this honestly — if you found the floor, held the position, breathed through the movement, and walked afterward with genuine attention — something in your body responded.
That response is worth acknowledging. Not because it means everything is fixed. But because it means your body can do this. It was designed to do this. And when given the right conditions, it moves toward what it was made for.
Every small change matters. Every moment you worked through difficulty instead of stopping was a step of strength, not just an exercise. The body was telling you where it needed attention — and you listened. That is the beginning of being a good steward of what God gave you.
Take a moment and thank Him.
Lord, I receive the healing You have for my body right now. I thank You that You designed me to move, to recover, and to be whole. I accept the responsibility of stewardship — to do the work, to listen to my body, and to trust that every step forward, however small, is a step You are in. I speak alignment over my body in Jesus name. I receive Your healing grace. Amen.